fbpx

#4 [FREE Instructions] How to Create a Website/Blog (Step-by-Step Beginner’s Guide)

Create a Website/Blog

Trust me, creating your own website or blog these days is very simple and straightforward.

All you need is WordPress and a Hosting Account (e.g. BlueHost)!

And you can have your website up and running for only AUD $6/month (Less than a coffee &Toastie!).

You can follow my Step-by-Step Instructions from this free Beginner’s Guide to create your own website/blog in less than 30 minutes.

5 Easy Steps:

  1. Pick a Domain Name & Create your Hosting Account
  2. Install WordPress on your Hosting Account
  3. Choose a WordPress Theme
  4. Design Your Website/Blog
  5. Launch Your Website/Blog

Now, let’s dive into these 5 Easy Steps to get started!

STEP ONE

#1 - Pick a Domain Name & Create your Hosting Account

The combination of website/blogging platform and hosting service that I personally use (also used by more than 2 million website owners) is WordPress, hosted by Bluehost.

One of the most attractive benefits of Bluehost is that you get a FREE Domain Name for the 1st year when you Sign Up.

(1) Click here to head over to Bluehost

(2) Click at the green “Get Started Now” button

(3) Choose a hosting plan – Recommend the ‘Choice Plus’ Plan

I think the ‘Choice Plus’ Plan in the best value plan, because it comes with Domain Privacy, which will protect your personal information from being published online (including your name, email address, contact number and home address). You can also get a lot more unlimited features, including unlimited websites for future growth.

If you’re happy for people to know who owns the blog with your personal information, then you can choose the ‘Basic’ plan.

Or you can choose the ‘Basic’ plan first and then add the domain privacy during the checkout process for around $1/month.

Once decided, click the green “Select” button.

(4) Create a Domain Name

Just type in a name that you would like your website to have (mine is cexperiences.com).

If your domain name isn’t available, you can either try another name or skip this step by clicking at “I will create my domain later”.

While the name you choose is one of the more important parts of setting up your website, remember that you can always change in the future—so don’t let this step hold you back.

Some ideas to help you:

  • Choose something that’s close to your topics, your niche or your message?
  • What name would grab your customer’s or reader’s attention?
  • Choose something short and catchy that will be easily remembered?
  • Or use your name or nickname as personal branding (For example, fullname.com or nickname.com or whoisname.com)

(5) Create your Account

A. Fill in your account details.

B. Choose an Account Plan & Package Extras

If you want to lock in the lowest price (and gets your domain privacy) for the next 3 years, choose ‘Prime 36 Months Price’ because this low pricing for new customers only applies to the first payment you make.

If you are not sure how long you want to keep your website up and running, you can choose the 12 Month Plan to get started first. But note that your pricing may go up after that first year.

About Package Extras:

Depends on your budget, you can choose all extras for peace of mind.

But I normally don’t click any of the other options as they’re not essential. You can skip all if you don’t need them. 

About the SEO Tools, I will show you later on in this guide some plugins & tools that you can use for FREE.

You will see the total amount you need to pay today.

Note: There is a 30-day money back guarantee in case things don’t go as planned with your website.


C. Enter Payment Information and Submit

After entering your payment information, remember to check the box as acknowledgment before clicking the green “Submit” button.

(6) Create a Password for your Account

You’ll see this page after creating and paying for your Bluehost account.

Simply click on the green button to create your password.

STEP TWO

#2 - Install WordPress on your Hosting Account

(1) Check your email

You should then receive an email from BlueHost with all your account and login details. Check your spam folder if you haven’t received it.

Keep your login and welcome information safe as you may need it for future reference.

(2) Install WordPress (Automatic installation if you use Bluehost)

You don’t need to worry about this step. The other reason why I recommend Bluehost is that it acts as a one-stop shop and WordPress will be automatically installed for you.  

(3) Login to your BlueHost account

After creating a new Password, all you have to do is click ‘Log in’ and choose a theme to start building your website immediately.

STEP THREE

#3 - Choose a WordPress Theme

(1) Choose a WordPress Theme

WordPress comes with a ton of free themes to choose from, so start with one of the options.

If you are not sure which theme you want, don’t worry! You can go back and change it later.

Note that there are Free Themes and Premium Themes (Paid).


(2) Change/Add a new Theme (if required)

You can skip this step if you don’t need to change the theme.

If you want to add another theme, log into the WordPress dashboard site and you will see the Navigation Side Bar on the left hand side of the screen.

 Move the mouse over “Appearance” menu and then click on “Themes”.

Click at “Add New Theme” on the screen.

You can easily browse the themes either by the category tabs at the top, or by using the Feature Filter, or by using the search bar at the right hand corner.

Once decided, click at the red “Install” button to install the theme of your choice.

Once installed, click at the red “Activate” button.

If you change your mind later on, you can always add another new theme, or switch back to your old theme.

If have purchased a theme from another site, in order to upload your theme:   

  1. Click at “Themes” under the “Appearance” Menu side bar.
  2. At the top of the page, click at the “Upload” button.
  3. Once the page refreshes, click at the “Upload Theme” button.
  4. Click at “Choose File” to upload your theme .zip file.

STEP FOUR

#4 - Design Your Website/Blog

(1) Learn your WordPress Dashboard features and functionality

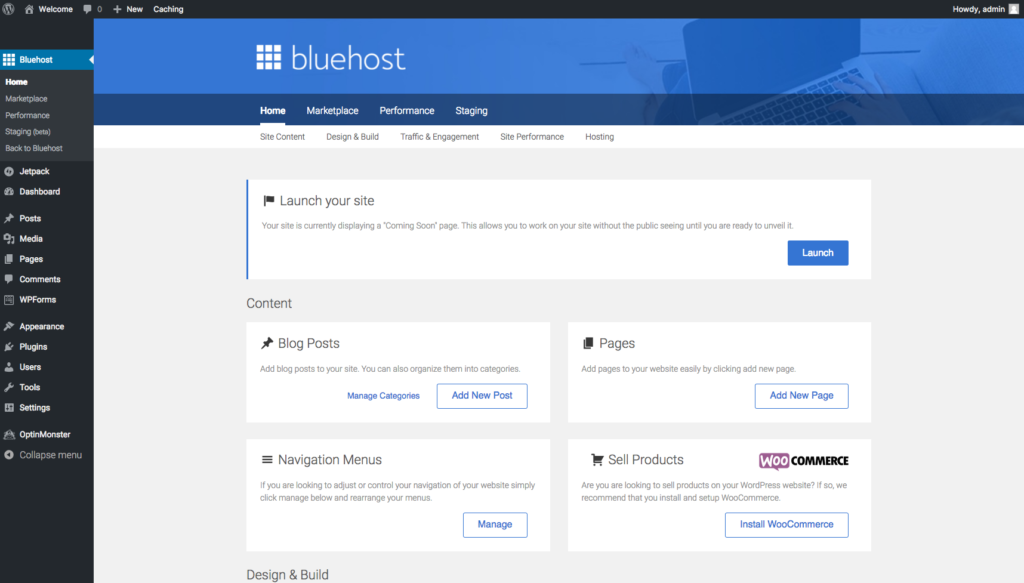
The best way to get to know your way around is to click on each tab and explore the options.

Spend some time learning this dashboard by reviewing features that you will use most often.

Watch some YouTube tutorials to learn more quickly.

(2) Customize Settings and your default site URL

Change the default URL of your website to include a “www” before your site URL, so that it looks much cleaner and tends to feel more trustworthy to readers.

Click at “Settings > General” on the left hand navigation side bar.

Add “www” to your WordPress Address (URL) and Site Address (URL).

Update the rest of the settings for your website.

Click at the red “Save Changes” button.

Also update other settings including “Settings > Reading” for your homepage display, and “Settings > Permalinks”

(3) Install Plugins

Plugins let you add all sorts of features, like SEO (Search Engine Optimization), email capturing, image optimization, social media integration etc.

Click at “Plugins > Add New” on the left hand navigation side bar.

Suggest installing these essential plugins today:

  • Elementor
  • ‘Yoast SEO’ or ‘All In One SEO Pack’
  • EWWW Image Optimizer
  • WPForms

Click at the “Install Now” button and then go to the “Installed Plugins” page to activate the plugin if you want to start using them.

(4) Set up Menu Structure

You can set up the menu structure later after you have edited or published your pages.

When you’re ready to create a homepage or footer menu, just click at “Appearance> Menus” on the left hand navigation side bar.

Select the pages you want to add, and then click at the “Add to Menu” button.

(5) Create/Edit Pages for your website

Click at “Pages >All Pages” on the left hand navigation side bar.

Choose the page (You can start with main/home Page) that you want to edit, and click at “Edit”.

If you want to edit the website content, click at “Edit with Elementor”.

You can start filling out all the basics for your website.

  • Customize your theme with colors, font styles, headers and footers.
  • Upload your logo.
  • Upload photos to inspire your site visitors and add clues about your values and services.
  • Create your first blog post and main page content.
  • Add a contact form

Once ready, you can either ‘Publish’ it immediately, or schedule another time to publish it, or simply ‘Save Draft’. After you published it, you can always come back to make changes and publish it again.

STEP FIVE

#5 - Launch Your Website/Blog

What do you do once you’ve hit publish?

Pop the champagne and celebrate!

You have completed these 5 major steps to create and launch your website. Well done!

Share the great news and the wonderful website that you just created with your family and friends. =)

If you want to bring your website/blog to the next level, Sign Up below to request for a FREE copy of Bonus Guide (See below Resources). With this Bonus Guide, you will:

  • Learn how to design your website more efficiently;
  • Get free and useful plugins, tools, websites and softwares that you can use;
  • Learn how to drive Traffic to your website;
  • Learn how to make money from your website or by blogging.

Additional Resources:

1. Beginner’s Guide (eBook) - FREE

Let me know if you want the Beginner’s Guide Digital Copy for easy reference.

    2. Bonus Guide (eBook) – Coming Soon

    RESERVE NOW! Only FREE for the first 50 people on the waiting list (Usual Value $30)

      The Bonus Guide (eBook) will be launched very soon. If you want to bring your website/blog to the next level and don’t want to miss out a FREE COPY. RESERVE NOW!

      Highlights of the Bonus Guide:

      • Learn how to design your website more efficiently;
      • Free and useful plugins, tools, websites and softwares that you can use;
      • Learn how to drive Traffic to your website;
      • Learn how to make money from your website or by blogging.

      Be the first 50 people to get this Bonus Guide for FREE! Usual Value is $30.

      GET ON THE WAITING LIST and RESERVE NOW! 

      3. Book an Appointment / Training Session

      If you do get stuck on any part of this guide, or if you need assistance to set up or design a website for you, you can book a one-on-one appointment or training session with me.

      You can contact me here.

      Follow CExperiences

      Don’t want to miss out the latest from CExperiences?

      Subscribe now to receive tips, ideas and insights about website building, blogging, online business, personal developement and entrepreneurship. 

      Please follow and like us:
      error
      fb-share-icon